The precision and efficiency of chip repair in modern mobile devices rely heavily on the use of proper tools, and among these, the phone BGA reballing stencil is a standout. A Reballing Stencils Phone Repair allows technicians to reflow or replace solder balls on Ball Grid Array (BGA) chips with pinpoint accuracy, reducing errors and improving the overall reliability of repairs. This guide will provide a comprehensive, step-by-step approach to using a phone BGA reballing stencil effectively.
Understanding the Phone BGA Reballing Stencil
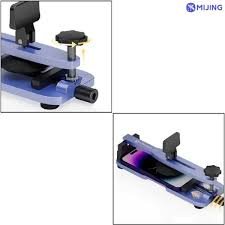
Before diving into the procedure, it’s crucial to understand what a phone BGA reballing stencil is. Essentially, it is a thin metal or stainless steel sheet with laser-cut holes that match the layout of solder balls on a BGA chip. By aligning the stencil over the chip, technicians can accurately apply solder paste or balls in the correct pattern, ensuring precise connectivity when the chip is reflowed onto a motherboard.
The importance of a phone BGA reballing stencil cannot be overstated, as even minor misalignments can lead to shorts, open circuits, or functional failures in the repaired device.
Tools and Materials Required
To use a phone BGA reballing stencil successfully, you will need the following items:
- Phone BGA reballing stencil suited to the chip
- BGA solder balls (typically lead-free)
- Solder paste or flux
- Tweezers or vacuum pickup tool
- Reflow station or hot air gun
- Cleaning supplies (isopropyl alcohol, lint-free cloth)
- Heat-resistant pad or work surface
Having all tools organized before beginning ensures a smooth workflow and reduces the risk of damaging delicate components.
Preparing the BGA Chip
The first step in using a phone BGA reballing stencil is to prepare the chip for reballing. This involves removing the old solder balls carefully without damaging the chip pads. Use a hot air gun or rework station to heat the chip slightly and lift off residual solder. Clean the chip surface with isopropyl alcohol to remove any flux or debris. A clean, smooth surface is essential for the stencil to work properly.
Aligning the Stencil
Accurate alignment of the phone BGA reballing stencil over the chip is critical. Place the stencil on the chip and ensure that each hole aligns precisely with the chip pads. Some technicians use alignment frames or magnifying tools to double-check positioning. Misalignment at this stage can result in uneven solder distribution, which may cause connectivity issues.
Applying Solder Paste or Balls
Once the stencil is aligned, apply the solder balls or paste into the stencil holes. If using solder balls, gently press them into the holes using a small roller or tool to ensure each ball is seated correctly. If using paste, use a squeegee to spread it evenly across the stencil. The goal is to fill every hole completely and uniformly, as this will determine the quality of the reflowed connections.
Removing the Stencil
After the solder is applied, carefully lift the phone BGA reballing stencil away from the chip. The solder balls or paste should now sit perfectly on the chip pads, ready for reflow. Handle the chip gently to avoid displacing the solder balls, which could compromise the accuracy of the repair.
Reflowing the Chip
The next step involves reflowing the solder balls to create solid connections. Place the prepared chip on a heat-resistant surface and use a reflow station or hot air gun to heat the solder. Follow the manufacturer’s recommended temperature profile to prevent overheating the chip. As the solder melts, surface tension will naturally align the balls to the pads, forming strong and reliable connections.
Inspecting the Work
Inspection is vital after reflowing. Use a microscope or magnifying glass to ensure that all solder balls are properly attached and that there are no bridges, gaps, or defects. A properly executed phone BGA reballing stencil process results in a clean, uniform solder layout, which is essential for the chip to function correctly once reinstalled.
Installing the Reworked Chip
Once inspection confirms successful reballing, the chip is ready to be placed onto the phone’s motherboard. Align the chip carefully with the motherboard pads and perform a final reflow to secure the chip in place. After cooling, test the phone to ensure the chip functions correctly and that all connections are stable.
Maintenance and Best Practices
Using a phone BGA reballing stencil requires attention to detail and proper maintenance:
- Clean the stencil after each use to prevent solder buildup.
- Store stencils in a safe, dry place to avoid warping or damage.
- Always use compatible solder balls and paste to match chip specifications.
- Practice on scrap chips to perfect alignment and reflow techniques before handling critical devices.
Adhering to these best practices not only extends the life of your stencil but also improves the success rate of BGA reballing operations.
Conclusion
Mastering the use of a phone BGA reballing stencil is a crucial skill for any mobile repair technician. By following the step-by-step guide—preparing the chip, aligning the stencil, applying solder, reflowing, and inspecting—technicians can achieve precise, reliable results. This process ensures that chips are reworked with accuracy, improving device performance and extending the lifespan of mobile electronics. Investing time and attention in proper stencil use will significantly enhance repair quality and efficiency in any phone repair workshop.
The phone BGA reballing stencil is more than just a tool; it is an essential component in achieving professional-grade BGA repairs, making it a must-have for serious technicians seeking accuracy, consistency, and high-quality results.